Hotter'n Hell Hot Pepper Relish
So, there's this guy up by my former office -- "Oink Johnson" -- and he sets up a BBQ trailer on the roadside every Friday, Saturday, and Sunday.
Aside from the awesome pulled pork that he sells, he offers his home-smoked thick-cut bacon, and what he calls "Oink Johnson's Kill 'Em Dead Hot Pepper Relish."
I'm not one for hyperbole, but I must say right here that his pulled pork is among the best I've had -- and I've had pulled pork all over the US. My deep, dark business-travel secret is that I hunt down pulled pork and BBQ wherever I'm traveling. In the southern US, there are many places to be found, but here in the northeastern US, the "pickin's is slim"! So when I found Oink, I thanked the Great BBQ God in the sky for his providence.
Oink's hot pepper relish made a big hit at the smart candle-lit suppers for which I'm so famous. (Anyone who gets that reference gets extra credit.) I serve it with cream cheese and crackers. The best.
I've probably bought eight or ten jars of the stuff from Oink and used them myself or given them to my buddy Dewey who loves this stuff as much as I do.
A hot pepper relish like this should be easy to make. At his BBQ trailer, Oink had an ingredient list: peppers, salt, sugar, vinegar. Can't get simpler than that. He put it up in 8-ounce jars. Heck, why couldn't I make this??
The relish is soupy. It is not a jam or jelly. It's sweet, vinegary, and profoundly hot, but not cripplingly so -- just enough to enjoy. There's clearly no pectin, confirmed by Oink's ingredient list. I did a bit of snooping around on the Internet, and came up with a couple recipes, none as simple as Oink's, but they did give me an idea of proportions.
I gave it a whack, and I think I succeeded. I bought the peppers, and started in.
6 cups chopped peppers: about 1/2 hot and 1/2 sweet.
(Clearly, this ratio determines which level of hell you decide to descend to)
1/4 cup salt
2 cup sugar
2 1/2 cups white vinegar
Chop the peppers in your food processor to a fine mince. I used about a pound of long, green, hot peppers and a handful of jalapenos, and the balance were red and reddish-green bell peppers. My ratio was about half-and-half hot to sweet. I'd bet that if you made this in late summer with ripe, red peppers it would be awesome, but I wasn't about to pay $3.99 a pound for red bell peppers in December! In fact, I bought one-dollar grab-bag peppers at Iovine's Produce in Reading Terminal Market. They were just fine!
Measure out six cups into a mixing bowl. Add salt. Cover (I used a damp dish towel to keep the hot-pepper fumes at bay) and let sit an hour or so to draw out moisture.
Drain the pepper/salt mixture and measure out six cups into a 6-quart stainless pot. Add the sugar.
Cook over medium heat until the sugar is fully dissolved. Add vinegar. Bring to a simmer, and let cook until it thickens a bit, about 20 minutes or so. It will not become jammy (there's not nearly enough sugar to get to that point), but it will appear "cooked."
Sterilize eight 8-ounce jars in the dishwasher, and ladle the hot, cooked pepper relish into the jars.* Seal. Clean out your pot. Fill halfway with hot water, and bring to a boil. Arrange the jars in the pot, cover, bring the water back to a boil, and process for 5 minutes. Remove with jar tongs.**
The seals will pop as they cool. When they've cooled to room temperature, refrigerate.
Dang, I gotta tell you, this stuff is good!!
* Invest in a canning funnel. Really. Best investment you'll make.
** Invest in a jar tongs. Really. See above.
6DOP will cover a broad range of topics related to food and cooking -- recipes, entertaining and dinner parties, cookbooks, restaurants, and food science. 6DOP will be yummy, satisfying, unapologetically biased and opinionated, and damn tasty.
Showing posts sorted by relevance for query peppers. Sort by date Show all posts
Sunday, December 20, 2009
Hotter'n Hell hot pepper relish
Dave loves to eat, and cook, and feed his family and friends. Thankfully Dave's family and friends like to eat what he cooks.
Dave has achieved the Great American Dream -- suburban banality. He cooks from his modestly appointed kitchen in the leafy suburbs of Delaware County, Pennsylvania, a stone's throw from Philadelphia.
Stop by for dinner. Or lunch. Or breakfast.
Sunday, October 5, 2014
Pickled hot peppers
Just finished a batch of pickled hot peppers -- jalapenos and cherry hots.
I did them with a sweet pickling brine, much like one used for bread and butter pickles. These will be great on sandwiches, or in a batch of pimento cheese.
Cut up about two pounds of mixed hot peppers. I used jalapenos, and green and red cherry hots. Salt them liberally, cover them, and let them sit in the fridge overnight -- about 16 hours. N.B. You MUST use rubber gloves when handling this much fruit. Be careful not to rub your eyes or nose while you're doing this, or you will regret it.
Drain the brined peppers and rinse them very well under cold, running water. The ample salt needs to be rinsed off. Don't worry that you'll be un-salting the peppers -- there will still be plenty absorbed into the peppers.
Make a brine of equal parts sugar and vinegar. (I used 5 cups each, so that I'd be sure to have enough pickling liquid. Add a tablespoon each of peppercorns and mustard seed.
Bring to a boil, then add the raw peppers. Bring this just back to the boil. Then cover and get ready to fill your clean jars.
While your pickling liquid (I hesitate to call it a brine, as there's no salt in it...) is coming to the boil, put on a large pot of water in which you'll eventually process your filled jars.
Sterilize your jars, lids, and bands. You can boil them, or put them in a hot (375°F) oven for 15-20 minutes. I ovened the jars and bands, and boiled the lids very gently.
I encourage all readers of Six Degrees of Preparation to consult the National Center for Home Food Preservation, out of the University of Georgia, for details on pickling. Excellent resource.
Ladle the peppers into the jars using your canning funnel to keep things neat. Then ladle pickling liquid to fill to the 1/4-inch mark (that is, the bottom of the canning funnel, conveniently calibrated to that measurement).
Run a knife around the inside of each jar to be sure there are no large air bubbles. Wipe the rims of the jars with a clean paper towel, put on the sterile lids, lightly screw on the bands, then process in a boiling water bath for 10 minutes.
After processing, remove to a clean, dry towel, and wait for the lids to pop. They should do so quickly. If not, you can try to reprocess any that haven't popped, or just use those jars right away and store in the fridge. Keep in mind that this is a potent pickling liquid -- sugar and vinegar -- and the likelihood of anything growing in this medium is remote.
Let stand at room temperature until well cooled. Even though these are "put up," I still store them in my basement refrigerator.
Store opened jars in the fridge.
I did them with a sweet pickling brine, much like one used for bread and butter pickles. These will be great on sandwiches, or in a batch of pimento cheese.
Cut up about two pounds of mixed hot peppers. I used jalapenos, and green and red cherry hots. Salt them liberally, cover them, and let them sit in the fridge overnight -- about 16 hours. N.B. You MUST use rubber gloves when handling this much fruit. Be careful not to rub your eyes or nose while you're doing this, or you will regret it.
Drain the brined peppers and rinse them very well under cold, running water. The ample salt needs to be rinsed off. Don't worry that you'll be un-salting the peppers -- there will still be plenty absorbed into the peppers.
Make a brine of equal parts sugar and vinegar. (I used 5 cups each, so that I'd be sure to have enough pickling liquid. Add a tablespoon each of peppercorns and mustard seed.
Bring to a boil, then add the raw peppers. Bring this just back to the boil. Then cover and get ready to fill your clean jars.
While your pickling liquid (I hesitate to call it a brine, as there's no salt in it...) is coming to the boil, put on a large pot of water in which you'll eventually process your filled jars.
Sterilize your jars, lids, and bands. You can boil them, or put them in a hot (375°F) oven for 15-20 minutes. I ovened the jars and bands, and boiled the lids very gently.
I encourage all readers of Six Degrees of Preparation to consult the National Center for Home Food Preservation, out of the University of Georgia, for details on pickling. Excellent resource.
Ladle the peppers into the jars using your canning funnel to keep things neat. Then ladle pickling liquid to fill to the 1/4-inch mark (that is, the bottom of the canning funnel, conveniently calibrated to that measurement).
Run a knife around the inside of each jar to be sure there are no large air bubbles. Wipe the rims of the jars with a clean paper towel, put on the sterile lids, lightly screw on the bands, then process in a boiling water bath for 10 minutes.
After processing, remove to a clean, dry towel, and wait for the lids to pop. They should do so quickly. If not, you can try to reprocess any that haven't popped, or just use those jars right away and store in the fridge. Keep in mind that this is a potent pickling liquid -- sugar and vinegar -- and the likelihood of anything growing in this medium is remote.
Let stand at room temperature until well cooled. Even though these are "put up," I still store them in my basement refrigerator.
Store opened jars in the fridge.
Dave loves to eat, and cook, and feed his family and friends. Thankfully Dave's family and friends like to eat what he cooks.
Dave has achieved the Great American Dream -- suburban banality. He cooks from his modestly appointed kitchen in the leafy suburbs of Delaware County, Pennsylvania, a stone's throw from Philadelphia.
Stop by for dinner. Or lunch. Or breakfast.
Sunday, July 17, 2011
Hot summer day -- time to roast peppers
Few foods are as tantalizing as roasted red peppers. When peppers are in season this time of year and are inexpensive (I've gotten them recently as cheap as $1.35/lb), I fire up the grill and start roasting.
Get the grill very hot, and lay the peppers across. Close the lid and let them char on one side, which will take a few minutes. After the one side is charred, turn them, and char the other sides.
Once charred, place them in a covered pot or a paper grocery sack and let them steam and cool. This will help the skins to detach from the flesh.
Peel the charred skin from each pepper -- it will pretty much fall off. Don't rinse the peppers under water, though you might be tempted. The bits of clinging charred skin that you can't remove adds nice flavor.
Pull our the stem and seed pod.
Pull apart the tender, roasted flesh. You probably won't need a knife.
Let the sliced up peppers drain in a colander for an hour.
Dress the peppers with salt, black pepper, chopped garlic, parsley and ample extra virgin olive oil.
If you make a large batch of peppers -- and I recommend that you do -- dress only what you'll eat now, and freeze the rest in zipper bags for later use.
Get the grill very hot, and lay the peppers across. Close the lid and let them char on one side, which will take a few minutes. After the one side is charred, turn them, and char the other sides.
Once charred, place them in a covered pot or a paper grocery sack and let them steam and cool. This will help the skins to detach from the flesh.
Peel the charred skin from each pepper -- it will pretty much fall off. Don't rinse the peppers under water, though you might be tempted. The bits of clinging charred skin that you can't remove adds nice flavor.
Pull our the stem and seed pod.
Pull apart the tender, roasted flesh. You probably won't need a knife.
Let the sliced up peppers drain in a colander for an hour.
Dress the peppers with salt, black pepper, chopped garlic, parsley and ample extra virgin olive oil.
If you make a large batch of peppers -- and I recommend that you do -- dress only what you'll eat now, and freeze the rest in zipper bags for later use.
Dave loves to eat, and cook, and feed his family and friends. Thankfully Dave's family and friends like to eat what he cooks.
Dave has achieved the Great American Dream -- suburban banality. He cooks from his modestly appointed kitchen in the leafy suburbs of Delaware County, Pennsylvania, a stone's throw from Philadelphia.
Stop by for dinner. Or lunch. Or breakfast.
Monday, February 3, 2014
Fried stuffed peppers
This is one of those dishes from every Italian mother's repertory -- long, sweet peppers (sometimes called "cubanelle" in grocery stores), that have been stuffed with a savory bread mixture, then fried until tender.
It's filling, frugal, vegetarian, and delicious. Makes a great side dish to a roast, or chicken cutlets, or a main course for a Lenten Friday.
For the savory bread stuffing, to fill 6 - 8 peppers, depending on size:
6 slices good-quality white sandwich bread (like Pepperidge Farm or Arnold's), crusts and all, pulsed into crumbs in a food processor
Enough milk to moisten the crumbs, maybe a scant half cup
A clove or two garlic, crushed
Salt and pepper
A couple tablespoons chopped parsley
A couple tablespoons capers, drained and chopped
A dozen olives, chopped (any sort will do -- from green olives with pimentos from a jar, to Kalamata, to oil-cured Sicilian)
1/4 cup grated pecorino
A good drizzle of olive oil
An anchovy filet or two, if desired.
Moisten the crumbs with the milk. You want to have a soft mass, but not a soupy one. Add the other ingredients as you have and as you like. You're aiming for a savory mixture, and very accurate measurements are not too critical. I like to add an anchovy filet for savor, but feel free to leave it out if you don't like it. If you want to taste the mixture prior to filling the peppers, take a tablespoon of it, place it in a ramekin, and pop it into the microwave for a few seconds to cook. Taste for seasoning. Adjust as necessary.
Prep the peppers: cut the tops off, and remove the seed pod. Spoon a couple tablespoons of the stuffing mixture into each pepper, being very careful not to overstuff. The stuffing will expand as it cooks, as you can plainly see in the photo below.
Heat a skillet over a medium burner, film with olive oil, and add the peppers. I find the easiest way to cook these is in a 350°F oven, for about 15-20 minutes, turning every so often so they cook evenly. Alternately, you can continue to cook them on the stovetop.
You will likely notice that as the peppers cook, the skins will darken and begin to peel. No need to worry, but if you're so inclined, you can peel them off before serving -- they come off very easily.
Serve hot, or at room temperature.
By the way, that skillet in the photo is my 12-inch DeBuyer steel skillet. Steel (not stainless, mind you), get very 'ugly' very quickly as they are used and seasoned, but they conduct heat nicely, and can be used on the stovetop or in the oven. A nice investment, and compared to stainless pans (like All-Clad), much less expensive.
It's filling, frugal, vegetarian, and delicious. Makes a great side dish to a roast, or chicken cutlets, or a main course for a Lenten Friday.
For the savory bread stuffing, to fill 6 - 8 peppers, depending on size:
6 slices good-quality white sandwich bread (like Pepperidge Farm or Arnold's), crusts and all, pulsed into crumbs in a food processor
Enough milk to moisten the crumbs, maybe a scant half cup
A clove or two garlic, crushed
Salt and pepper
A couple tablespoons chopped parsley
A couple tablespoons capers, drained and chopped
A dozen olives, chopped (any sort will do -- from green olives with pimentos from a jar, to Kalamata, to oil-cured Sicilian)
1/4 cup grated pecorino
A good drizzle of olive oil
An anchovy filet or two, if desired.
Moisten the crumbs with the milk. You want to have a soft mass, but not a soupy one. Add the other ingredients as you have and as you like. You're aiming for a savory mixture, and very accurate measurements are not too critical. I like to add an anchovy filet for savor, but feel free to leave it out if you don't like it. If you want to taste the mixture prior to filling the peppers, take a tablespoon of it, place it in a ramekin, and pop it into the microwave for a few seconds to cook. Taste for seasoning. Adjust as necessary.
Prep the peppers: cut the tops off, and remove the seed pod. Spoon a couple tablespoons of the stuffing mixture into each pepper, being very careful not to overstuff. The stuffing will expand as it cooks, as you can plainly see in the photo below.
Heat a skillet over a medium burner, film with olive oil, and add the peppers. I find the easiest way to cook these is in a 350°F oven, for about 15-20 minutes, turning every so often so they cook evenly. Alternately, you can continue to cook them on the stovetop.
You will likely notice that as the peppers cook, the skins will darken and begin to peel. No need to worry, but if you're so inclined, you can peel them off before serving -- they come off very easily.
Serve hot, or at room temperature.
By the way, that skillet in the photo is my 12-inch DeBuyer steel skillet. Steel (not stainless, mind you), get very 'ugly' very quickly as they are used and seasoned, but they conduct heat nicely, and can be used on the stovetop or in the oven. A nice investment, and compared to stainless pans (like All-Clad), much less expensive.
Dave loves to eat, and cook, and feed his family and friends. Thankfully Dave's family and friends like to eat what he cooks.
Dave has achieved the Great American Dream -- suburban banality. He cooks from his modestly appointed kitchen in the leafy suburbs of Delaware County, Pennsylvania, a stone's throw from Philadelphia.
Stop by for dinner. Or lunch. Or breakfast.
Saturday, March 17, 2012
Sausage skillet supper
I made a simple supper the other night -- skillet-roasted sausages with sweet red bell peppers, onions, and potatoes.
1 lb pork sausage
2 red bell peppers, cored and sliced
2 medium onions, peeled and quartered (hint, leave a bit of the root end on, and the quarters will remain coherent)
3 cloves garlic
2 medium red-skin potatoes
Even better, I used my new heavy-gauge steel skillet which I bought last week at Williams-Sonoma with a gift card. Love it.
The sausages are from Martin's in Reading Terminal Market. They have an excellent selection of sausages. I bought their luganega, which is a pork sausage with garlic, cheese, and parsley.
Zap the potatoes in the microwave for a few minutes until tender. Quarter and let cool a bit. Season with salt, pepper, thyme, garlic powder, and drizzle some olive oil over, tossing to coat completely.
Start the sausages in an ovenproof skillet: add a bit of water, cover, and steam for about 5 minutes. Uncover, and let the remaining water evaporate. Doing this gives the sausages a good head-start in cooking, so that once in the oven, all they need to do is brown.
Drizzle in a bit of olive oil, then arrange sliced peppers, quartered onions, and the seasoned, quartered potatoes around. Peel a few cloves of garlic, and add them whole to the pan. Season with salt and pepper, and sprinkle a bit of thyme over all. Give it all a good stir.
Roast in a 400°F oven for about 20 minutes, stirring occasionally, or until the sausages and potatoes are browned, and the vegetables are tender.
1 lb pork sausage
2 red bell peppers, cored and sliced
2 medium onions, peeled and quartered (hint, leave a bit of the root end on, and the quarters will remain coherent)
3 cloves garlic
2 medium red-skin potatoes
Even better, I used my new heavy-gauge steel skillet which I bought last week at Williams-Sonoma with a gift card. Love it.
The sausages are from Martin's in Reading Terminal Market. They have an excellent selection of sausages. I bought their luganega, which is a pork sausage with garlic, cheese, and parsley.
Zap the potatoes in the microwave for a few minutes until tender. Quarter and let cool a bit. Season with salt, pepper, thyme, garlic powder, and drizzle some olive oil over, tossing to coat completely.
Start the sausages in an ovenproof skillet: add a bit of water, cover, and steam for about 5 minutes. Uncover, and let the remaining water evaporate. Doing this gives the sausages a good head-start in cooking, so that once in the oven, all they need to do is brown.
Drizzle in a bit of olive oil, then arrange sliced peppers, quartered onions, and the seasoned, quartered potatoes around. Peel a few cloves of garlic, and add them whole to the pan. Season with salt and pepper, and sprinkle a bit of thyme over all. Give it all a good stir.
Roast in a 400°F oven for about 20 minutes, stirring occasionally, or until the sausages and potatoes are browned, and the vegetables are tender.
Dave loves to eat, and cook, and feed his family and friends. Thankfully Dave's family and friends like to eat what he cooks.
Dave has achieved the Great American Dream -- suburban banality. He cooks from his modestly appointed kitchen in the leafy suburbs of Delaware County, Pennsylvania, a stone's throw from Philadelphia.
Stop by for dinner. Or lunch. Or breakfast.
Sunday, September 11, 2011
Sunday in the kitchen
A productive day in the kitchen -- roasted a big pile of red peppers, steamed a few artichokes, and made a pot of pasta e ceci.
I've posted here about roasted peppers before. The peppers at Gentile's Produce Market were magnificent and cheap -- $1.49/lb. I bought two grocery sacks full.
I haven't written about steaming or stuffing artichokes, and I should. Add that one to the list.
As for the pasta e ceci, it's a typical bean and pasta soup that's a staple in every Italian kitchen, a minestrone. Every recipe is identical and different at the same time. I'll outline a very basic recipe that you can modify to your needs and tastes.
2 large onions
2 large carrots
a big stalk of celery
6 cloves of garlic
Coarsely chop the veggies, and then process in your food processor until finely chopped. This is what Lidia Bastianich calls her "pestata." (Others call it a soffritto, but it's much the same thing.) It's an excellent base for soups, stews, and the like.
In a large Dutch oven, warm 1/4 cup olive oil. Add the pestata, a bay leaf, and sprig or two of thyme. Saute the pestata until it starts to color.
Add two 14-oz cans of chick peas ("ceci"), drained, to the pot. Add 6 cups stock (or water, if you want to keep this wholly vegetarian).
Cut up three ripe tomatoes into large chunks. Process into a puree. Add to the pot.
Bring to a boil, reduce heat, and simmer about 20 minutes until the chick peas are tender. Salt and pepper as necessary. Remove the bay leaf and thyme sprigs. Drop an immersion blender into the pot and puree a bit, leaving some beans whole.
Add 1/2 pound of ditalini or tubettini pasta. Bring again to a boil, and cook until the pasta is just tender. Turn off the heat. Taste for seasoning. Add a handful of chopped parsley at the end if you'd like -- it adds a nice color and flavor. Serve in soup plates. Drizzle with some olive oil, and pass grated cheese at the table.
This soup is always better the next day.
Variations on a theme: Saute bacon or pancetta in the olive oil before adding the pestata. If you don't have chick peas, any bean will do -- cannellini, pinto, navy, kidney. If you used dried split peas, you'd have pea soup. If you don't have fresh tomatoes, use canned whole tomatoes and crush them with your hands before adding. If all you have is tomato paste, that'll work, too. Add it to the sauteing pestata, then add your stock or water.
I've posted here about roasted peppers before. The peppers at Gentile's Produce Market were magnificent and cheap -- $1.49/lb. I bought two grocery sacks full.
I haven't written about steaming or stuffing artichokes, and I should. Add that one to the list.
Steamed artichokes, perfumed with lemon and olive oil.
As for the pasta e ceci, it's a typical bean and pasta soup that's a staple in every Italian kitchen, a minestrone. Every recipe is identical and different at the same time. I'll outline a very basic recipe that you can modify to your needs and tastes.
2 large onions
2 large carrots
a big stalk of celery
6 cloves of garlic
Coarsely chop the veggies, and then process in your food processor until finely chopped. This is what Lidia Bastianich calls her "pestata." (Others call it a soffritto, but it's much the same thing.) It's an excellent base for soups, stews, and the like.
In a large Dutch oven, warm 1/4 cup olive oil. Add the pestata, a bay leaf, and sprig or two of thyme. Saute the pestata until it starts to color.
Add two 14-oz cans of chick peas ("ceci"), drained, to the pot. Add 6 cups stock (or water, if you want to keep this wholly vegetarian).
Cut up three ripe tomatoes into large chunks. Process into a puree. Add to the pot.
Bring to a boil, reduce heat, and simmer about 20 minutes until the chick peas are tender. Salt and pepper as necessary. Remove the bay leaf and thyme sprigs. Drop an immersion blender into the pot and puree a bit, leaving some beans whole.
Add 1/2 pound of ditalini or tubettini pasta. Bring again to a boil, and cook until the pasta is just tender. Turn off the heat. Taste for seasoning. Add a handful of chopped parsley at the end if you'd like -- it adds a nice color and flavor. Serve in soup plates. Drizzle with some olive oil, and pass grated cheese at the table.
This soup is always better the next day.
Variations on a theme: Saute bacon or pancetta in the olive oil before adding the pestata. If you don't have chick peas, any bean will do -- cannellini, pinto, navy, kidney. If you used dried split peas, you'd have pea soup. If you don't have fresh tomatoes, use canned whole tomatoes and crush them with your hands before adding. If all you have is tomato paste, that'll work, too. Add it to the sauteing pestata, then add your stock or water.
Dave loves to eat, and cook, and feed his family and friends. Thankfully Dave's family and friends like to eat what he cooks.
Dave has achieved the Great American Dream -- suburban banality. He cooks from his modestly appointed kitchen in the leafy suburbs of Delaware County, Pennsylvania, a stone's throw from Philadelphia.
Stop by for dinner. Or lunch. Or breakfast.
Saturday, May 21, 2011
Spring supper for the cousins
Hosting dinner tonite for my cousins Matt Pacello and Kate Pacello Dunn and her hubby Eric.
Dinner starts with antipasti -- a few different cheeses, toasts and bread, olives, roasted peppers, and some garlic-infused oil for dipping.
Then penne al pomodoro. Simple and perfect. I made the sauce already, and used a lot of sweet, red bell pepper, and a couple anchovy fillets -- my secret ingredient.
Roast pork shoulder, with oven-roasted potatoes, and a green salad with Caesar dressing .
The Dunns are bringing dessert.
Dinner starts with antipasti -- a few different cheeses, toasts and bread, olives, roasted peppers, and some garlic-infused oil for dipping.
Then penne al pomodoro. Simple and perfect. I made the sauce already, and used a lot of sweet, red bell pepper, and a couple anchovy fillets -- my secret ingredient.
Roast pork shoulder, with oven-roasted potatoes, and a green salad with Caesar dressing .
The Dunns are bringing dessert.
Dave loves to eat, and cook, and feed his family and friends. Thankfully Dave's family and friends like to eat what he cooks.
Dave has achieved the Great American Dream -- suburban banality. He cooks from his modestly appointed kitchen in the leafy suburbs of Delaware County, Pennsylvania, a stone's throw from Philadelphia.
Stop by for dinner. Or lunch. Or breakfast.
Tuesday, February 2, 2010
Hungarian goulash
I got inspiration to do this recipe when I saw a recent episode of America's Test Kitchen the other day. It looked like a great dish.
I went online to find it, but banged right into ATK's buy-before-you-see policy; in other words, they offer no recipes for free. You have to purchase an online membership at a minimum for recipe access. The hell with that.
It's not like I haven't made stews, chilies, navarins, and the like, so I figured I could deduce this one, just from what I watched. Piece o'cake.
1/4 cup oil
4 medium onions, coarsely diced
6 garlic cloves, sliced
Salt and pepper
1/4 cup paprika (I buy mine at a local Indian market, at 42nd & Walnut Sts in Philly.)
1 12-ounce jar roasted peppers (find them in the Italian aisle at the supermarket), pureed
3 lb pork shoulder, cut into 1-inch cubes
2 large carrots, thickly sliced
4-5 cups stock (I made a quick pork stock with pork neck bones I had in the freezer; chicken stock or beef stock would work just find, and frankly, so would water) -- just enough to cover the meat
1 bay leaf
Sauté the onions and garlic in the oil. Salt and pepper to taste. Add paprika, and cook for a minute or two. Add the pureed roasted red pepper and cook for another minute.

Bring to a simmer on the stovetop, then pop into a 325°F oven for three hours, until the pork is fall-apart tender, and about a third of the liquid is evaporated.
Serve with buttered noodles or buttered rice to hung[a]ry friends.
Dang, that's good! Thank you, ATK, for nuttin'!
I went online to find it, but banged right into ATK's buy-before-you-see policy; in other words, they offer no recipes for free. You have to purchase an online membership at a minimum for recipe access. The hell with that.
It's not like I haven't made stews, chilies, navarins, and the like, so I figured I could deduce this one, just from what I watched. Piece o'cake.
1/4 cup oil
4 medium onions, coarsely diced
6 garlic cloves, sliced
Salt and pepper
1/4 cup paprika (I buy mine at a local Indian market, at 42nd & Walnut Sts in Philly.)
1 12-ounce jar roasted peppers (find them in the Italian aisle at the supermarket), pureed
3 lb pork shoulder, cut into 1-inch cubes
2 large carrots, thickly sliced
4-5 cups stock (I made a quick pork stock with pork neck bones I had in the freezer; chicken stock or beef stock would work just find, and frankly, so would water) -- just enough to cover the meat
1 bay leaf
Sauté the onions and garlic in the oil. Salt and pepper to taste. Add paprika, and cook for a minute or two. Add the pureed roasted red pepper and cook for another minute.
Sauteed onion and garlic.
Paprika, in bulk.
Roasted red pepper puree.
With paprika and roasted red pepper added.
Add pork cubes, carrots, stock, bay leaf.
Carrots.
Cubed pork shoulder.
Simmering pork stock, made from neck bones.
Ready to simmer...
Serve with buttered noodles or buttered rice to hung[a]ry friends.
Dang, that's good! Thank you, ATK, for nuttin'!
Dave loves to eat, and cook, and feed his family and friends. Thankfully Dave's family and friends like to eat what he cooks.
Dave has achieved the Great American Dream -- suburban banality. He cooks from his modestly appointed kitchen in the leafy suburbs of Delaware County, Pennsylvania, a stone's throw from Philadelphia.
Stop by for dinner. Or lunch. Or breakfast.
Monday, August 12, 2013
August tomatoes
August. Tomatoes. Gratin. Crostini.
A great way to enjoy the wonderful tomatoes in the markets this month. I picked up a few pounds of beautiful red and yellow tomatoes at a farm stand while driving across the Delmarva Peninsula this weekend, on my way from Stone Harbor, NJ to Annapolis MD.
The first thing I did after returning home was to make a quick Sunday supper of tomato and mozzarella crostini. Magnificent. These were the yellow tomatoes -- to my taste, quite different in character from red tomatoes. Sweet, fruitier.
I toasted some good Italian bread, then rubbed the slices with a clove of raw garlic (you can see the garlic left after the rubbing in the photo). Plopped a thick slice of tomato on top of each slice, seasoned with salt and pepper, then topped with a slice of fresh mozzarella and a good glug-glug of Spanish olive oil.
You could, if you had some lying about, put a dollop of basil pesto on each slice of bread or atop the mozzarella, but I didn't have any handy, so forewent the pesto. Next time. I need to make some pesto anyway with the bounty of basil in the garden.
I made a tomato gratin as a side dish for Monday's dinner, to accompany oven-roasted sausage and peppers.
2 tomatoes, sliced 1/4" thick (about 10 slices total) (I used one red and one yellow tomato.)
1 Tbp butter
1 Tbp olive oil
2 cloves garlic, crushed
1 1/2 c panko bread crumbs
salt and pepper
3 Tbp grated parmigiano or pecorino cheese
2 Tbp chopped fresh basil
2 tsp thyme
Melt the butter and olive oil in a small skillet. Add crushed garlic and saute 30 seconds. Add bread crumbs, salt and pepper, and stir for a few minutes until very lightly -- but not fully -- browned, and the crumbs are completely coated with the oil and butter mixture. Add basil, thyme, cheese. Mix well. Set aside.
Arrange about 1/3 of the crumbs in the bottom of a greased gratin dish. Bake in a 375°F oven for 10 minutes until golden brown. Cool slightly.
Arrange half the tomato slices in the gratin dish. Season with salt and pepper. Cover with another 1/3 of the crumbs. Add another layer of tomatoes. Cover with the remaining 1/3 of the crumbs. Drizzle with a bit of olive oil.
Bake in a 375°F oven for about 20 minutes.
A great way to enjoy the wonderful tomatoes in the markets this month. I picked up a few pounds of beautiful red and yellow tomatoes at a farm stand while driving across the Delmarva Peninsula this weekend, on my way from Stone Harbor, NJ to Annapolis MD.
The first thing I did after returning home was to make a quick Sunday supper of tomato and mozzarella crostini. Magnificent. These were the yellow tomatoes -- to my taste, quite different in character from red tomatoes. Sweet, fruitier.
I toasted some good Italian bread, then rubbed the slices with a clove of raw garlic (you can see the garlic left after the rubbing in the photo). Plopped a thick slice of tomato on top of each slice, seasoned with salt and pepper, then topped with a slice of fresh mozzarella and a good glug-glug of Spanish olive oil.
You could, if you had some lying about, put a dollop of basil pesto on each slice of bread or atop the mozzarella, but I didn't have any handy, so forewent the pesto. Next time. I need to make some pesto anyway with the bounty of basil in the garden.
I made a tomato gratin as a side dish for Monday's dinner, to accompany oven-roasted sausage and peppers.
2 tomatoes, sliced 1/4" thick (about 10 slices total) (I used one red and one yellow tomato.)
1 Tbp butter
1 Tbp olive oil
2 cloves garlic, crushed
1 1/2 c panko bread crumbs
salt and pepper
3 Tbp grated parmigiano or pecorino cheese
2 Tbp chopped fresh basil
2 tsp thyme
Melt the butter and olive oil in a small skillet. Add crushed garlic and saute 30 seconds. Add bread crumbs, salt and pepper, and stir for a few minutes until very lightly -- but not fully -- browned, and the crumbs are completely coated with the oil and butter mixture. Add basil, thyme, cheese. Mix well. Set aside.
Arrange about 1/3 of the crumbs in the bottom of a greased gratin dish. Bake in a 375°F oven for 10 minutes until golden brown. Cool slightly.
Arrange half the tomato slices in the gratin dish. Season with salt and pepper. Cover with another 1/3 of the crumbs. Add another layer of tomatoes. Cover with the remaining 1/3 of the crumbs. Drizzle with a bit of olive oil.
Bake in a 375°F oven for about 20 minutes.
Dave loves to eat, and cook, and feed his family and friends. Thankfully Dave's family and friends like to eat what he cooks.
Dave has achieved the Great American Dream -- suburban banality. He cooks from his modestly appointed kitchen in the leafy suburbs of Delaware County, Pennsylvania, a stone's throw from Philadelphia.
Stop by for dinner. Or lunch. Or breakfast.
Sunday, January 16, 2011
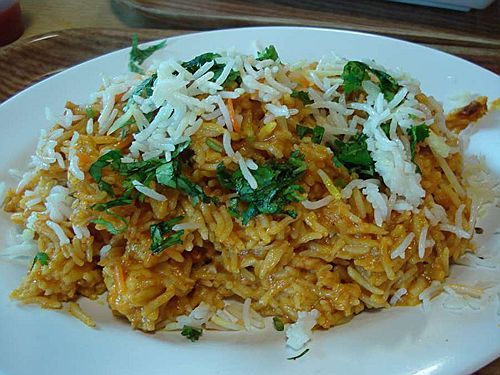
Chicken biryani
Remarkably easy to do, and great for a crowd. Be sure to prep all your ingredients ahead of time and have them at the ready to use.
If you're wary of Indian food, you'll find that this is a good dish to try -- it's not 'challenging' to the Western palate, and this particular recipe is fragrant and flavorful, without being 'spicy' or hot. The raisins add a nice sweetness to the rice.
You might well not have coriander seeds, cumin seeds, cardamom pods, or whole dried chilis in your pantry. If that's the case, you can use the dry ground spices you'll find in the supermarket. You'll need to ratchet down the quantities -- 2 tsp coriander seeds are equivalent to probably 1 tsp dry ground coriander, and so on.
8 chicken thighs
Salt and pepper
1/4 c vegetable oil
2 cinnamon sticks
1 bay leaf
2 tsp coriander seeds
6 cardamom pods
2 tsp cumin seeds
3 dried chili pepper pods
1 medium onion
6 cloves garlic
2 Tbp fresh ginger
2 c basmati rice
4 cups chicken stock
1/2 c raisins
Sliced toasted almonds
Whole-milk Greek yogurt
Chopped cilantro
Preheat oven to 350°F.
Peel the onions, garlic, and ginger. Chop coarsely, and process to a paste in a food processor. Set aside.
Combine the coriander, cardamom, and cumin seeds, and crush gently in a mortar. Set aside.
Pour oil into a 6-quart Dutch oven and heat. Dry the chicken pieces, season liberally with salt and pepper, and place skin side down in the hot oil. Sauté until the skin is well browned, about 8 minutes. Turn and brown the other side. Remove pieces to a warm platter.
Remove about half the oil and set aside. Add the crushed spices, cinnamon sticks, bay leaf, and chili peppers to the hot oil and sauté briefly until the aromas are released -- about 30 seconds. Add the onion-ginger-garlic paste, and sauté briefly.
Add uncooked rice, and sauté a few minutes. Add raisins. Add stock and salt to taste, and return the chicken pieces to the Dutch oven. Bring to a simmer on the stovetop, then put into a 350°F oven. Let cook in the oven about 40-50 minutes, until all the liquid has been absorbed, and the rice is cooked. Fluff with a fork.
Serve the rice on a warmed platter, with the chicken pieces arranged on top. Sprinkle with sliced toasted almonds.
Serve with whole-milk Greek yogurt into which fresh chopped cilantro has been stirred.
Dave loves to eat, and cook, and feed his family and friends. Thankfully Dave's family and friends like to eat what he cooks.
Dave has achieved the Great American Dream -- suburban banality. He cooks from his modestly appointed kitchen in the leafy suburbs of Delaware County, Pennsylvania, a stone's throw from Philadelphia.
Stop by for dinner. Or lunch. Or breakfast.
Saturday, July 3, 2010
Sriracha sauce
One of my blog readers asked me about the Sriracha sauce I included in the Tom-Tom Salsa recipe.
It's great stuff -- a bit like ketchup, if you will, but where the main ingredient is ripe, red chili peppers rather than tomatoes. Add in vinegar and sugar and you have Sriracha. It's similar to Tabasco, but considerably sweeter, and more viscous. Again, like ketchup.
It's made in the US, in California, despite the appearance from the bottle that it comes from somewhere overseas.
Have a look at the company's website. http://huyfong.com/frames/index.htm
You can find Sriracha these days pretty much anywhere. Every supermarket seems to have it, and you can certainly find it in any Asian grocery.
I like to use Sriracha in the same way one would use Tabasco sauce -- in BBQ sauces, guacamole, salsas of every kind, as well in creamy foods, like mac 'n' cheese, clam chowder, and deviled eggs. It's awesome on chicken cutlets, and scrambled eggs. Squirt a bit on your burger along with your ketchup. Wow.
It's great stuff -- a bit like ketchup, if you will, but where the main ingredient is ripe, red chili peppers rather than tomatoes. Add in vinegar and sugar and you have Sriracha. It's similar to Tabasco, but considerably sweeter, and more viscous. Again, like ketchup.
It's made in the US, in California, despite the appearance from the bottle that it comes from somewhere overseas.
Have a look at the company's website. http://huyfong.com/frames/index.htm
You can find Sriracha these days pretty much anywhere. Every supermarket seems to have it, and you can certainly find it in any Asian grocery.
I like to use Sriracha in the same way one would use Tabasco sauce -- in BBQ sauces, guacamole, salsas of every kind, as well in creamy foods, like mac 'n' cheese, clam chowder, and deviled eggs. It's awesome on chicken cutlets, and scrambled eggs. Squirt a bit on your burger along with your ketchup. Wow.
Dave loves to eat, and cook, and feed his family and friends. Thankfully Dave's family and friends like to eat what he cooks.
Dave has achieved the Great American Dream -- suburban banality. He cooks from his modestly appointed kitchen in the leafy suburbs of Delaware County, Pennsylvania, a stone's throw from Philadelphia.
Stop by for dinner. Or lunch. Or breakfast.
Sunday, February 7, 2010
Pork Chili
This recipe is not unlike my pork stew. The difference is in the flavorings used. If you can get the various chili powders -- New Mexico, chipotle, pimenton, etc. -- it will make a vast difference in the flavor. Supermarket chili powder tends to be rather unassertive in character.
4-5 lb pork shoulder, cut into 1-inch cubes
An assortment of vegetables – carrots, onions, celery, garlic, bell pepper – to make 4 cups
Beer
Powdered chili peppers – 2 Tbp each of New Mexico, chipotle, and sweet pimenton (smoked Spanish paprika). If you don't have pimenton, use a good-quality sweet paprika.
2 Tbp ground cumin
28-oz can crushed tomatoes
Bay leaf
Salt & pepper
1/2 cup chopped cilantro
Like my pork stew, pork chili is SO superior to beef, that when you try this, you'll wonder how you've been making beef chili all these years.
This recipe is also different from many chili recipes in two ways: I do not use ground meat, and I don't add beans. In that respect it is similar to many Texas-style chilies, though most of them use beef.
Cut up the pork shoulder into 1-inch cubes. Season liberally. In a 5- or 6-quart Dutch oven, brown the pork in batches in a small amount of oil. (Don’t forget what Julia taught us: dry the meat before you add it to the pot, and don't crowd it!) Set aside the cooked pork cubes as they're done.
Cube the veggies. In the same pot, add a bit more oil, and brown the veggies lightly. Season them well. Add back the pork.
Add the chili powders, the cumin, and the bay leaf. Cook for a minute or two to brown the spice mixture. Add the crushed tomatoes.
Add the beer. I love a good amber beer like Yuengling Lager for the cooking liquid. Add enough liquid so that it barely comes to the top of the mixture of meat and veggies. You'll probably need 2 to 3 12-oz bottles of beer.
Bring the chili to a simmer on the stovetop, cover, and put into a 300-325°F oven for two to three hours, until the pork is fall-apart tender.
Test for seasoning and adjust as necessary. Add some fresh, chopped cilantro at the end if you like it. I do!
Serve with steamed, butter rice, sour cream, shredded cheddar or jack cheese, sliced pickled jalapenos, and chopped scallions.
4-5 lb pork shoulder, cut into 1-inch cubes
An assortment of vegetables – carrots, onions, celery, garlic, bell pepper – to make 4 cups
Beer
Powdered chili peppers – 2 Tbp each of New Mexico, chipotle, and sweet pimenton (smoked Spanish paprika). If you don't have pimenton, use a good-quality sweet paprika.
2 Tbp ground cumin
28-oz can crushed tomatoes
Bay leaf
Salt & pepper
1/2 cup chopped cilantro
Like my pork stew, pork chili is SO superior to beef, that when you try this, you'll wonder how you've been making beef chili all these years.
This recipe is also different from many chili recipes in two ways: I do not use ground meat, and I don't add beans. In that respect it is similar to many Texas-style chilies, though most of them use beef.
Cut up the pork shoulder into 1-inch cubes. Season liberally. In a 5- or 6-quart Dutch oven, brown the pork in batches in a small amount of oil. (Don’t forget what Julia taught us: dry the meat before you add it to the pot, and don't crowd it!) Set aside the cooked pork cubes as they're done.
Cube the veggies. In the same pot, add a bit more oil, and brown the veggies lightly. Season them well. Add back the pork.
Add the chili powders, the cumin, and the bay leaf. Cook for a minute or two to brown the spice mixture. Add the crushed tomatoes.
Add the beer. I love a good amber beer like Yuengling Lager for the cooking liquid. Add enough liquid so that it barely comes to the top of the mixture of meat and veggies. You'll probably need 2 to 3 12-oz bottles of beer.
Bring the chili to a simmer on the stovetop, cover, and put into a 300-325°F oven for two to three hours, until the pork is fall-apart tender.
Test for seasoning and adjust as necessary. Add some fresh, chopped cilantro at the end if you like it. I do!
Serve with steamed, butter rice, sour cream, shredded cheddar or jack cheese, sliced pickled jalapenos, and chopped scallions.
Dave loves to eat, and cook, and feed his family and friends. Thankfully Dave's family and friends like to eat what he cooks.
Dave has achieved the Great American Dream -- suburban banality. He cooks from his modestly appointed kitchen in the leafy suburbs of Delaware County, Pennsylvania, a stone's throw from Philadelphia.
Stop by for dinner. Or lunch. Or breakfast.
Saturday, July 7, 2012
Tomato salad yesterday, gazpacho today
I made a large platter of tomato salad for my July 4th BBQ, but no one's appetite seemed particularly robust that day, as the temperatures were hovering near 100°F.
Lots of leftovers.
The tomato salad was a combination of sliced tomatoes, arranged on a bed of cucumbers, red bell peppers, and onion (which you cannot see in the photo above), then doused generously with garlic-infused olive oil, and a generous sprinkling of dried oregano (from fresh oregano harvested from my herb garden). Plenty of salt and pepper, too. You have all the components of gazpacho on the platter, with perhaps the exception of stale bread, which is often a component of classic Andalusian gazpacho.
I was going for the "red, white, and blue" 4th of July theme with the blue platter, but I'm not wholly certain that blue is the best background for many foods....
The leftover salad was augmented with a few more tomatoes (cored and quartered), and pureed with an immersion blender.
After pureeing, I added a generous glug-glug of good olive oil, some red wine vinegar (or balsamic, or lemon juice, or sherry vinegar if you have it), and adjusted the seasoning -- it's a cold soup, and you need to be a bit more aggressive in your seasoning. You can also add Tabasco or Sriracha if you like a bit of kick.
Chill well. Probably best after a couple hours chilling.
Lots of leftovers.
The tomato salad was a combination of sliced tomatoes, arranged on a bed of cucumbers, red bell peppers, and onion (which you cannot see in the photo above), then doused generously with garlic-infused olive oil, and a generous sprinkling of dried oregano (from fresh oregano harvested from my herb garden). Plenty of salt and pepper, too. You have all the components of gazpacho on the platter, with perhaps the exception of stale bread, which is often a component of classic Andalusian gazpacho.
I was going for the "red, white, and blue" 4th of July theme with the blue platter, but I'm not wholly certain that blue is the best background for many foods....
The leftover salad was augmented with a few more tomatoes (cored and quartered), and pureed with an immersion blender.
After pureeing, I added a generous glug-glug of good olive oil, some red wine vinegar (or balsamic, or lemon juice, or sherry vinegar if you have it), and adjusted the seasoning -- it's a cold soup, and you need to be a bit more aggressive in your seasoning. You can also add Tabasco or Sriracha if you like a bit of kick.
Chill well. Probably best after a couple hours chilling.
Dave loves to eat, and cook, and feed his family and friends. Thankfully Dave's family and friends like to eat what he cooks.
Dave has achieved the Great American Dream -- suburban banality. He cooks from his modestly appointed kitchen in the leafy suburbs of Delaware County, Pennsylvania, a stone's throw from Philadelphia.
Stop by for dinner. Or lunch. Or breakfast.
Subscribe to:
Posts (Atom)


and