Friday, December 26, 2014

Tipsy trifle


First, you need an excellent, preferably home-made sponge cake, though you could use a store-bought Sara Lee pound cake easily enough.  Slice the cake into 1/4-inch slices. 

Make a quickie berry jam:  
            2 lbs frozen strawberries
            1 lb frozen raspberries
            1/4 cup water
            1 cup sugar
            Pinch salt
            2 tsp unflavored gelatin, hydrated in 2 Tbp water. 

Bring to a simmer, and cook gently until thickened a bit.  Mash the berries to make more homogeneous if necessary.  Add gelatin.  Let cool.  

This will not set up like a “Jello” dessert, but the gelatin will give it a bit more body.  It will not be as sweet as a commercial jarred jam. 

Feel free to use any jarred jam you like, though I am particular to strawberry, raspberry, or apricot for trifles.  I would NOT use Concord grape jam. 

Make a recipe of pastry cream.  (There’s really no good substitute for this.  Cooked pudding comes close, but lacks the richness, as there are no eggs.)
            1 qt milk
8 egg yolks
1 1/4 cup sugar
4 Tbp flour
4 Tbp corn starch
2 tsp vanilla extract
Pinch salt
2 Tbp softened butter

Scald milk gently over moderate heat.  (You can also do this in the microwave.)  Set aside. 

Beat egg yolks with sugar until smooth.  Add flour and corn starch.  Beat until smooth.  Add about a 1/2 cup of the warm milk by dribbles into egg/sugar/flour mixture and beat well until the egg mixture has been warmed up a bit (this is called “tempering”), then pour the egg/milk mixture back into the remaining hot milk. 

Cook over moderate heat, stirring constantly, until thickened like pudding.   Remove from heat.  Add vanilla extract.  Beat in butter. 

Cover surface with plastic wrap so that a skin does not form.  Let cool completely before using. 


Assemble your trifle in a straight-sided trifle bowl.

Layer sliced cake in the bottom.  Generously dribble rum (or other alcohol like brandy).  Spread cake with jam.  Spread some of the pastry cream.  Repeat several times, finishing with pastry cream.  

Trifle being assembled.  

Decorate with whipped cream on top, if desired. 

Monday, December 22, 2014

Latkes

It's Hanukkah 2014, and so it's time to make latkes!  What could be better: shredded potatoes with onions, fried into crisp pancakes in olive oil.

I invited Sammy over (as well as a few others, too) to share the event.  One cannot eat latkes alone.

5 lb Idaho potatoes, shredded in a food processor, rinsed in cold water (keeps them from turning brown), then wrapped in a linen towel and squeezed as dry as possible.
2 medium onions, also shredded in the food processor (no need to squeeze dry)
1 cup flour
1 Tbp salt
8 large eggs
~ 8 scallions, chopped

Mix well in a large bowl.  You will likely find that it's easiest to use your hands to mix this much stuff.

Heat a large skillet over medium-high heat.  Add olive oil to about 1/4".

Scoop up a ball of potato mixture (I use an ice cream scoop), gently squeeze out any additional moisture that may have accumulated, place into hot oil, flatten into a pancake, and brown on both sides over medium-high heat.  Each side will take about 5 minutes or so.  Ideally you want them brown and crisp.

Latkes frying in olive oil.

As they finish, remove them to a wire rack on baking sheet in a 200°F oven to keep warm.

Serve with applesauce and sour cream.  I also served them with whole-milk Greek yogurt sprinkled with za'atar spice, and a drizzle of olive oil.


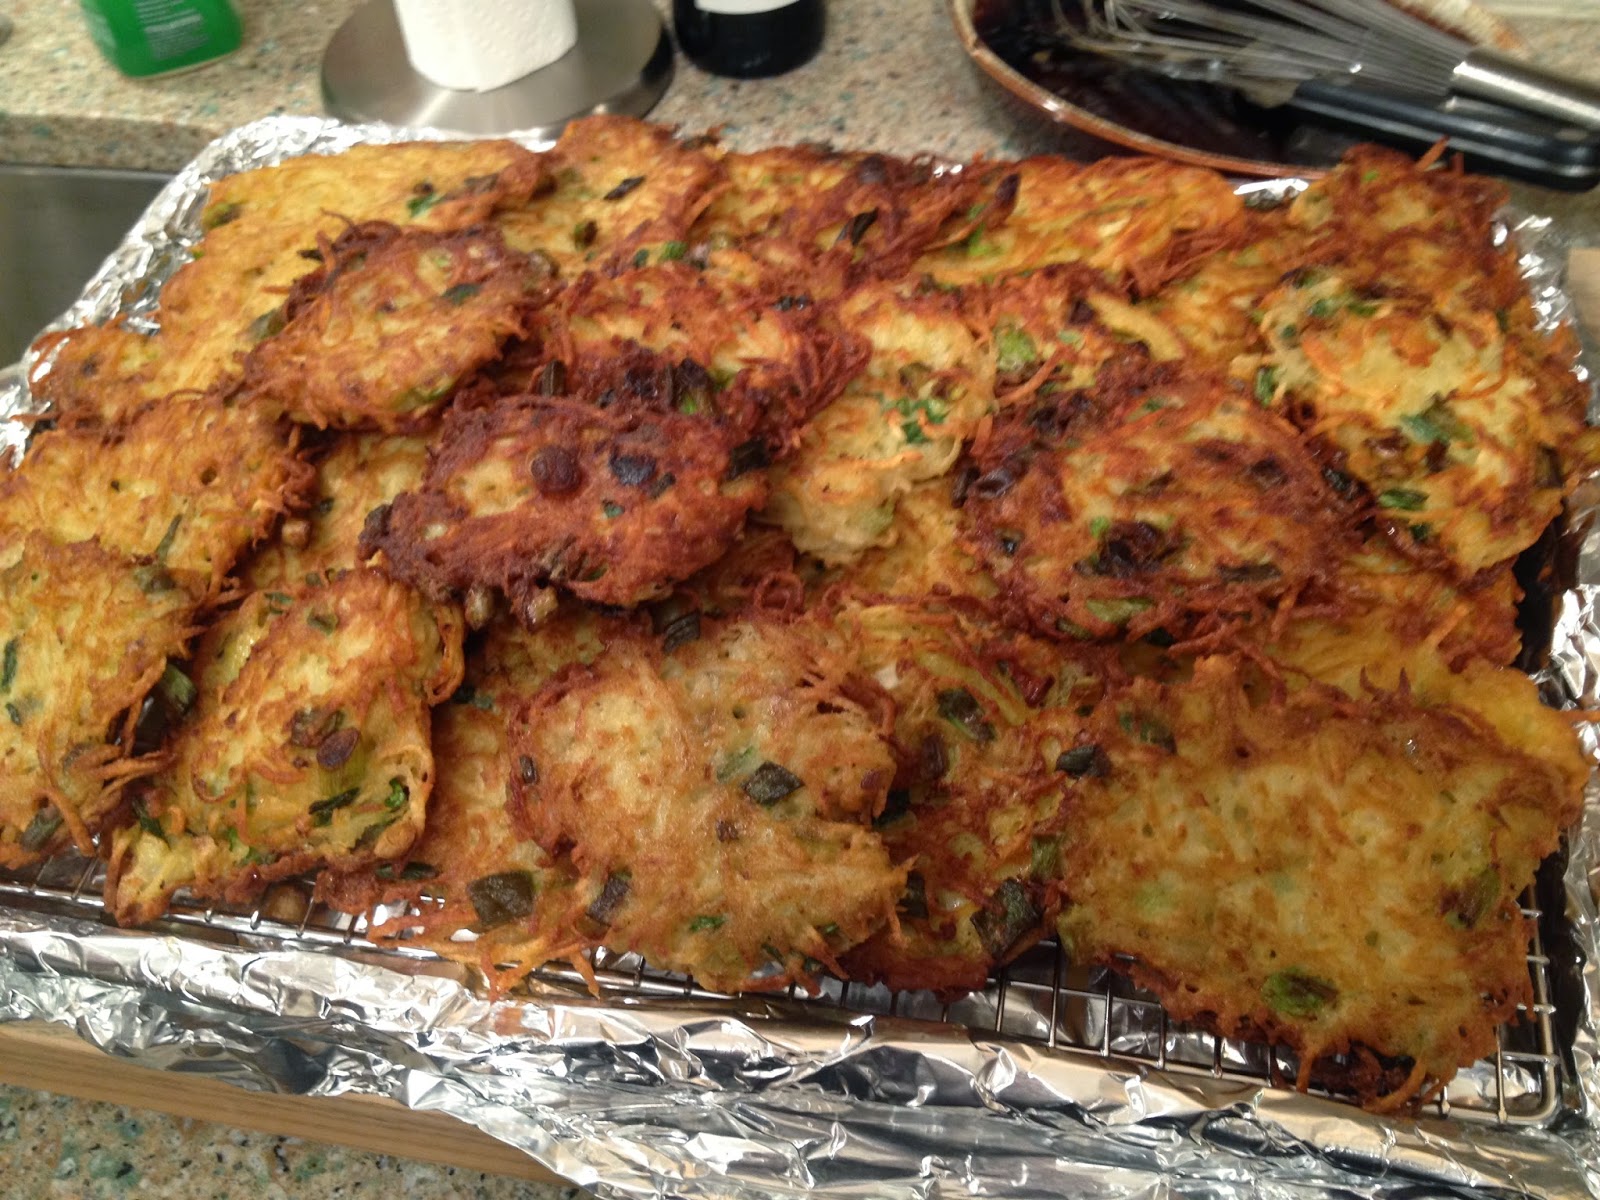
A big stack of finished latkes, just out of a warm oven.

Tuesday, December 9, 2014

Taking stock

There was a recent article in Huffington Post on "bone broth."  It's now a "health craze."  We just used to call it "stock," or even more simply, "soup."

Saveur Magazine got into the topic, too, in its Saveur 100 list for January 2015.


They used to laugh at us when we abstained from meat on Fridays during Lent.  Now "Meatless Mondays" are the hipster foodie craze, and of course, perfectly sensible.  Funny how we were ahead of the curve on these things...

I've made many a pot of stock in my life.  Few things are as satisfying from a cooking perspective as making a pot of stock.  Few things as satisfying from an eating perspective, too.

And I love buying the ingredients for a good stock: chicken bones (cheap, cheap, cheap!) from Giunta's in Reading Terminal Market, turkey or chicken necks and wings, beef shank bones, pork neck or rib bones.  They all make great stock.  Making stock is a great way to clean out the freezer, especially when you're frugal enough to save carcasses from roasted chickens, beef rib bones, chicken backs and necks, and leftover but uneaten roasts, chops, or chicken.


Pork and beef bones, from the local Korean supermarket, HMart.  The beef shank bones
give you the bonus of tender, delicious meat to chop and add to your finished soup.


More often than not, I brown the bones in a 350°F oven until nicely colored -- about 30-45 minutes, depending on the meat.  I'll typically toss a carrot or an onion in with the meat to brown alongside.

Browned meat then goes into the colander insert of my 12-qt pasta pot.  The meat is covered with a generous amount of cold water (around 8 quarts), and the pot is brought to the simmer.  With roasted/oven-browned meats, there typically isn't much scum to skim off, as you have with raw meats used for stock.

After the pot has come to a good simmer, I add my aromatics: an onion (halved, but not peeled), two carrots, two ribs of celery, a handful of parsley (or just parsley stems), half a dozen garlic cloves (not peeled, but each clove halved), a teaspoon of thyme or a few thyme sprigs if you have them, a bay leaf, a teaspoon of peppercorns. 

The pot is again brought to the simmer, the heat reduced, the pot covered.  Simmering time can be as little as 2 hours, and up to 5 or 6, depending on how much time and patience you have.  A long-simmering stock pot yields a richer, tastier stock. 

A pot of stock (in this instance, turkey) just underway. 

When your stock is finished simmering, let it cool substantially in the pot.  The wisdom of using the pasta pot for stock is that you can lift out the colander insert, with all the stock components, and let it drain.  Pick off any meat you'd like to reserve for your soup, and discard the rest.

If you wish, strain your stock through a fine-mesh sieve, cheesecloth, or even a moistened coffee filter fitted into a sieve, to remove any lingering bits. 

Typically, I pour the fresh stock into containers, let them chill in the fridge, then remove most of the fat.  At that point, you can use the stock for soup, freeze it for later use, or, if you want really rich stock, bring it back to a simmer in a large pot and let it reduce in volume to concentrate flavor.  This concentrated stock, because it was made with lots of bones, will almost certainly solidify into a jelly-like mass.  That's a good stock, full of protein in the form of gelatin, which offers the best taste and mouth-feel.

I never season stock when it is made, and only add salt later when I'm using the stock for soup, sauce, or other uses.  

 Ham and bean soup, made with ham stock.

A bubbling pot of green pea soup, made with a ham and pork-bone stock.

Cabbage soup with little meatballs.  Made with chicken stock.  

French onion soup, gratineed with toasted bread and Gruyère cheese, made with a rich beef stock.

And yes, I've even made vegetarian stock, which if you read the article, would not be the font of nutrition that a "bone broth" would be, as it is almost entirely devoid of protein, and certainly devoid of fat.

A pot of vegetable broth underway.  Lots of oven-roasted veggies (carrot, onion, celery), garlic, herbs, and dried mushrooms (of my own manufacture), which add "umami" to broth.  

Impressive color, from the roasted veggies and dried mushrooms.  Tasty, yes, but lacking the character of a meat and bone broth.


Sunday, November 16, 2014

Apple cider-braised pork shoulder

Fall weather allows us to consider the long-braising cuts of meat that seem unthinkable in spring or summer.

I bought a beautiful pork shoulder at Giunta's in Reading Terminal Market yesterday morning.  I had the butcher cut off the shank to make it a bit easier to fit into the covered casserole for braising.

I removed the rind that was still on the shoulder. (It's great to keep on when dry/open roasting, as it becomes crisp crackling, but braising does it no good.)  I retained the fat cap.

Seasoned it liberally with salt, and browned it on all sides in my vintage Magnalite covered roaster.


Trimmed up some veggies to encircle the roast while braising:  turnips, garlic, onions, shallots, carrots, and an apple.  And a nice bunch of herbs: thyme, rosemary, bay.   Veggies were lightly seasoned. 


With the roaster still over a medium flame, I added dry white vermouth, apple cider, and stock -- about equal volumes of each, about 3 - 4 cups liquid total.  The liquids were brought to a simmer, the roaster covered, and nestled into a 325°F oven for about three-and-a-half hours, until the meat was tender. 


 When finished braising, the roast was removed to a serving platter and covered until ready to slice and serve.  (It will stay warm for a long time.)  Vegetables were removed to a separate platter.

Pan juices were strained into an already prepared roux of butter and flour to make gravy.  I added a bit more stock to the gravy to bring it to the appropriate consistency, then let it simmer 10 minutes over low heat.  I tasted it for seasoning, but it needed nothing additional, not surprising since the pan juices were sufficiently seasoned from the roast and veggies.

I sliced the roast off the bone, and doused it with some of the pan juices that had accumulated in the bowl of resting veggies.

I served the roast with the accompanying braised veggies, a cheesy mashed potato casserole (mashed potatoes, cream cheese, butter, shredded swiss, topped with fried onions), oven-roasted Brussels sprouts dressed with garlic oil and balsamic vinegar, and the gravy.


Bonus: next morning, a breakfast hash made with onions and potatoes, leftover pork, chopped well, the leftover braised veggies, also well chopped, and a few dollops of leftover gravy.  Let it crust up in a skillet and served with eggs.


Sunday, October 5, 2014

Pickled hot peppers

Just finished a batch of pickled hot peppers -- jalapenos and cherry hots.

I did them with a sweet pickling brine, much like one used for bread and butter pickles.  These will be great on sandwiches, or in a batch of pimento cheese.

Cut up about two pounds of mixed hot peppers.  I used jalapenos, and green and red cherry hots.  Salt them liberally, cover them, and let them sit in the fridge overnight -- about 16 hours.  N.B.  You MUST use rubber gloves when handling this much fruit.  Be careful not to rub your eyes or nose while you're doing this, or you will regret it. 

Drain the brined peppers and rinse them very well under cold, running water.  The ample salt needs to be rinsed off.  Don't worry that you'll be un-salting the peppers -- there will still be plenty absorbed into the peppers. 


Make a brine of equal parts sugar and vinegar.  (I used 5 cups each, so that I'd be sure to have enough pickling liquid.   Add a tablespoon each of peppercorns and mustard seed.

Bring to a boil, then add the raw peppers.  Bring this just back to the boil.  Then cover and get ready to fill your clean jars. 


While your pickling liquid (I hesitate to call it a brine, as there's no salt in it...) is coming to the boil, put on a large pot of water in which you'll eventually process your filled jars.

Sterilize your jars, lids, and bands.  You can boil them, or put them in a hot (375°F) oven for 15-20 minutes.  I ovened the jars and bands, and boiled the lids very gently.

I encourage all readers of Six Degrees of Preparation to consult the National Center for Home Food Preservation, out of the University of Georgia, for details on pickling.  Excellent resource. 


Ladle the peppers into the jars using your canning funnel to keep things neat.  Then ladle pickling liquid to fill to the 1/4-inch mark (that is, the bottom of the canning funnel, conveniently calibrated to that measurement).

Run a knife around the inside of each jar to be sure there are no large air bubbles.  Wipe the rims of the jars with a clean paper towel, put on the sterile lids, lightly screw on the bands, then process in a boiling water bath for 10 minutes. 


After processing, remove to a clean, dry towel, and wait for the lids to pop.  They should do so quickly.  If not, you can try to reprocess any that haven't popped, or just use those jars right away and store in the fridge.  Keep in mind that this is a potent pickling liquid -- sugar and vinegar -- and the likelihood of anything growing in this medium is remote.  

Let stand at room temperature until well cooled.  Even though these are "put up," I still store them in my basement refrigerator.

Store opened jars in the fridge.